Guides · Getting started
Create your first walkthrough in Shadow Capture
Start with one short task in your own web application. This guide uses the product's own labels at every step and says where the human decisions are.
A walkthrough of one task, recorded from the real screens, with a scenario, an instruction and a hint for every step, Show me narration, and a reason for each wrong choice, checked against the recorded pages and reviewed by you. Then a file or SCORM package you can put in front of learners today.
Before you start
- An approved account. Registration creates an account that waits for approval; you get an email when it is open. Request access if you have not.
- A Chrome-compatible desktop browser with permission to load an unpacked extension. There is no Chrome Web Store listing yet, so the extension is a zip you unpack and load with Developer mode on. Learners need none of this.
- A task worth recording. The best first one is short, five to ten actions, has one decision that people get wrong, and can be performed in a staging copy or with fictional data. A frozen page keeps whatever was on screen when you recorded it.
- The right window. Record at the size your learners use. The extension's menu has a Window size option with presets if you want to be deliberate about it.
1. Install the extension and connect it
- Download it from Shadow Capture. On the Walkthroughs page, click Record
a walkthrough. The panel headed Record walkthroughs as you work has the
link Download the Chrome extension. Unpack the zip; it contains one folder,
shadowcapture-extension. - Load it in Chrome. Open
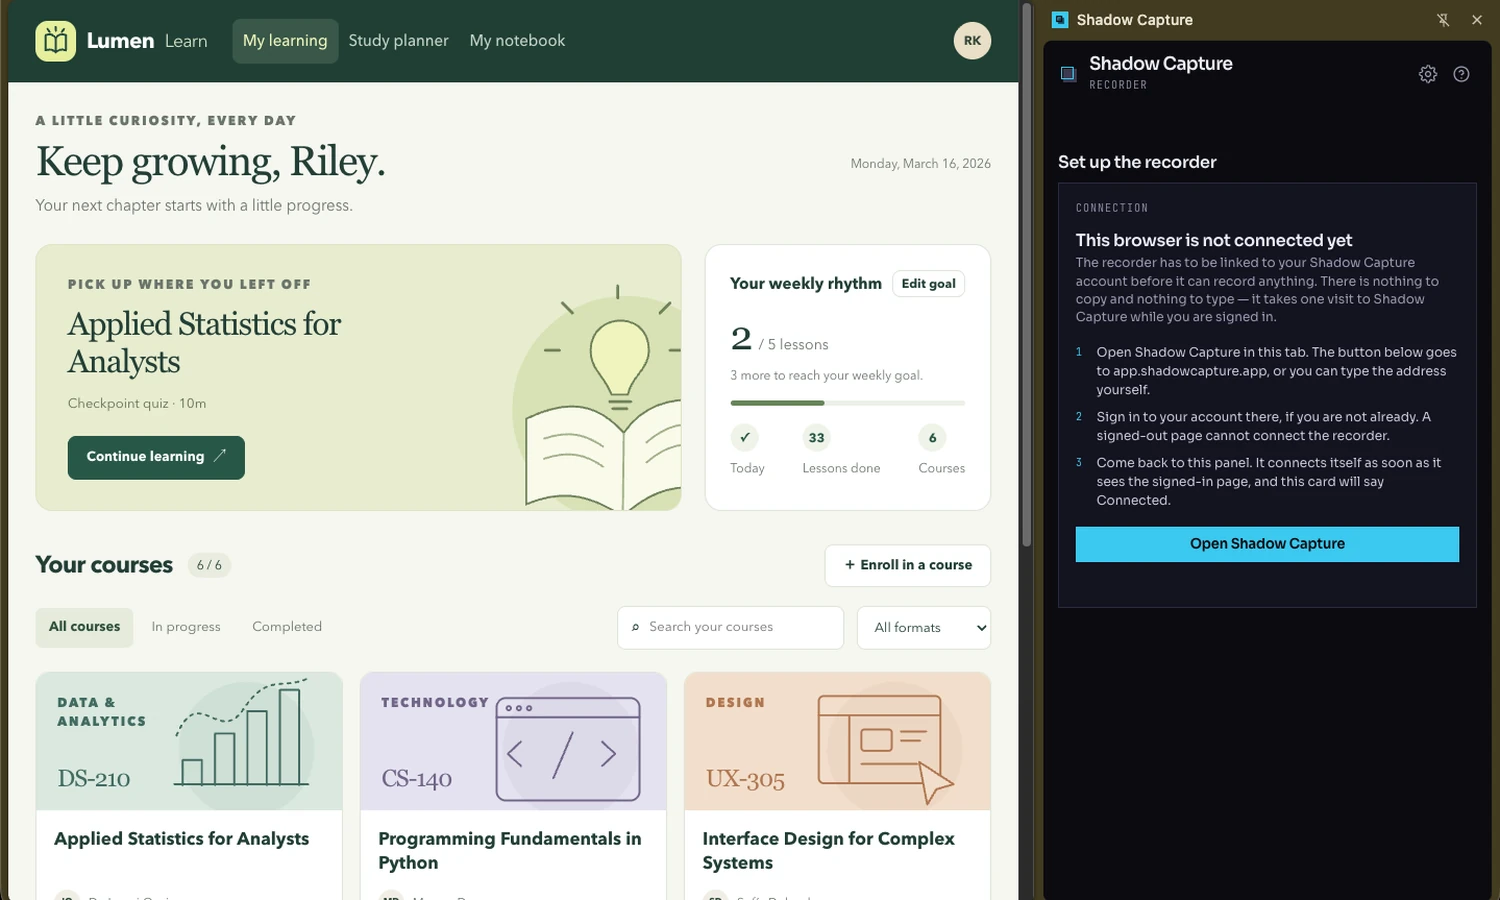
chrome://extensions, turn on Developer mode, click Load unpacked, and choose that folder. Click the toolbar icon to open the side panel. Its header reads Shadow Capture · Recorder. - Connect this browser. The panel opens on Set up the recorder, with a card reading This browser is not connected yet and the three steps shown above. With your Shadow Capture tab open and signed in, the browser connects on its own; if the panel is looking at another tab it offers Open Shadow Capture. When it reads Connected with your email and the server name, you are done. Nothing is typed or copied.
- Check the Account page. Under Connected browsers your browser is listed with a Revoke button. Revoking stops uploads from that browser immediately, which is the switch to know about before you record on a shared machine.
2. Record one run-through
- Open the application at the first screen of the task. Signed in, on the page where the task begins, with any test data you need already in place.
- Name it and start. In the side panel, under Record a walkthrough, type a title (it defaults to the page title) and click Start recording. The current page is captured as the first step. Leave Auto-capture page changes checked: it catches modals, drawers and big updates.
- Do the task once, at a normal pace. Every click, selection and typed value is recorded, and every new page or large change is captured after it settles. While a page is being captured a card reads Capturing this page and input is held for a couple of seconds; wait for Page captured before you carry on. The counters show captured and pending pages.
- Capture a step by hand if something was missed. Small popups, a filled form before you submit it, or a quiet change may not trigger auto-capture. Capture step takes the current state as a step.
- Finish and submit. Click Finish & submit. The panel reads Packaging…, then Sent with the draft's name and step count. The upload is automatic; there is nothing to save or drag. If a send fails the recording is kept, and Finish & submit again retries it. Discard throws it away, after a confirmation.
What was recorded: a self-contained copy of each page, a screenshot of each taken at the same moment, and the list of actions with their targets. Passwords, and fields marked as one-time codes or card numbers, are recorded as asterisks; other typed values are kept because the walkthrough needs them. Anything visible on the page is in the copy, which is the reason for the staging advice above.
3. Author it with AI
- Find it in the Authoring queue. Back on the Walkthroughs page, the strip headed Authoring queue holds the new draft with a DRAFT pill and two buttons: Author with AI and Review capture.
- Click Author with AI. Authoring is a deliberate click, not something that happens on upload. The status line first reads checking page rendering first: every captured page is re-rendered and compared with its screenshot, so the pass can steer around a page that did not freeze well. Then the pass runs, in turns, with a Stop button beside it. One pass runs at a time; a second draft waits.
- Wait. Expect a few minutes for a short task. Closing the tab does not stop it; reopening the page reconnects to the running pass. Stop leaves the draft exactly as it was.
- Read the result line. It reads Authored: N → M steps, with any warnings. Consecutive actions on one page may be grouped into teaching steps. The draft moves out of the queue into your library.
What the model was given, and not given: for each page, an outline of the visible text and an inventory of the interactive controls found on it, each with an identifier, plus the screenshot and your title. It chooses a target by identifier and Shadow Capture substitutes the verified selector. The result is validated before it is saved; a result that does not validate is refused as a whole, and your draft is left as it was.
4. Check it, then play it
- Open the walkthrough and play it in Show me. Click the card. Watch the whole thing once as a learner would. You are checking that each step lands on the right control and that the narration says what you would say.
- Play it in You try. Switch modes in the top bar. Make the wrong choice on purpose wherever there is a dropdown or a choice, and read the feedback. This is the copy learners will actually meet.
- Run the replay check if anything looked off. From the card's More options menu choose Review capture. Check render accuracy re-renders every page against its capture screenshot and labels each one RENDERS OK, MINOR DIFFERENCES or RENDER BROKEN, with the two images side by side; it takes a minute or two. Verify replay plays every step in the player, spotlights its target, and checks it is visible and correct, with one automatic repair pass for anything that fails; it takes a few minutes. Both are advisory: they report, and you decide.
5. Edit what you would say differently
- Open the editor. From the card's More options menu choose Edit. The player opens with an editing panel beside the captured screen and a rail listing every step.
- Edit any line directly. Each step has a Step title, an Instruction for You try, a Caption for Show me, and a Hint. Play step shows the step as it will run. Save commits; Revert changes discards what you have not saved.
- Or describe the change. AI assist… opens a panel with Describe a change. Say it in a sentence: shorten this hint, rename the customer on every screen, let any status be accepted at step four. Point at an element lets you click the control you mean. Apply with AI runs it against the whole walkthrough, validated before it is written; Undo last AI edit restores the version before it.
- Know what is kept. Every save keeps the previous version of the walkthrough and of any page an edit changed. The undo button covers the last AI edit; anything older is on disk in the walkthrough's history and takes a support request to restore for now.
6. Publish it
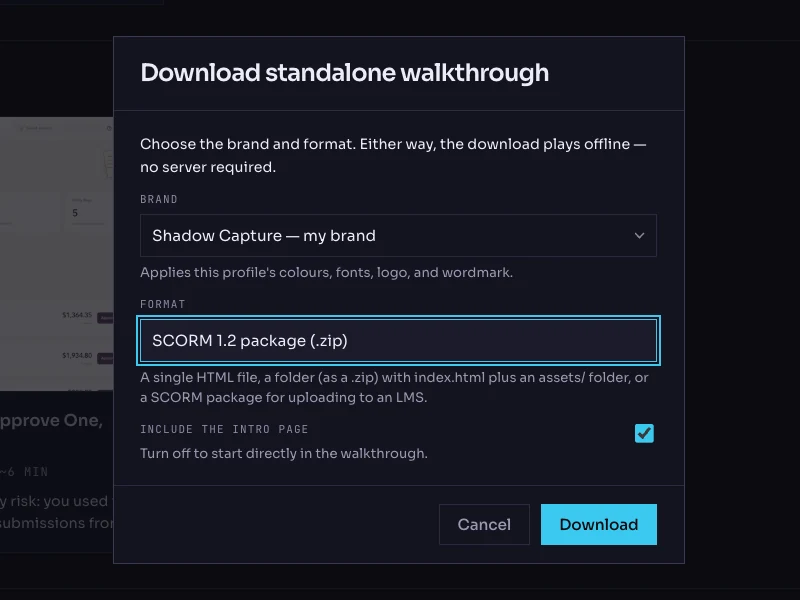
- Choose Download… from the card's menu. The dialog is Download standalone walkthrough. Pick a Brand profile, or leave the default.
- Pick the format. Single HTML file to email it or put it on a share; it runs with no connection. Folder (.zip) for hosting it yourself. SCORM 2004 package (.zip) or SCORM 1.2 package (.zip) for your LMS; the LMS publishing guides say which to choose and what it reports. Include the intro page is on by default.
- Or embed it. Embed… publishes a public copy and gives you a snippet that adds a Help button and a modal to any page you own, with the same brand choice, Entire player or Just the viewport, and a maximum width. Enable embedding turns it on; the snippet goes before the closing body tag.
- Put it in front of one learner. Before it goes to a cohort, watch one person who does not know the task work through it in You try. The step they stall on is the hint to rewrite.
When the product changes
A moved button is an AI assist sentence: point at the new control, say which step it belongs to, and check the result. A redesigned screen is a new recording of the task, and the old walkthrough stays as it was until you replace it. Shadow Capture does not watch your product for changes; a walkthrough is updated when you decide to update it.
Honest limits, in one place
- Capture is desktop Chrome first. Canvas-heavy interfaces, video and cross-origin embedded frames may not freeze faithfully; the render check will tell you.
- The extension is loaded unpacked, not installed from a store, until we list it.
- There is no version-history browser yet; the last AI edit is undoable, older versions are kept on disk.
- Authoring runs one walkthrough at a time per account.
- A walkthrough reports completion and time to an LMS, never a score.
Next
Pick the task that costs you most when somebody gets it wrong.
During beta we will record and review the first one with you, if you would rather start that way.